Taking pictures as you hike
is time consuming and inconvenient but well worth the effort. My most prized possession is a photo album of all the
beautiful places my wife and I have visited.
 |
Gear |
 |
Camera: Don't carry any equipment you care overly much
about. As you hike, your camera will be jostled, banged, crushed and exposed to
hot, dusty, sandy conditions which takes its toll on equipment over time.
A camera with a metal body will prove to be more durable, but will be heavier
and more expensive. Adjustable exposure and focus are important and will give
you the most versatility in the field.
Lens: Almost any will do. Wider angle lenses are best for
narrow canyons and scenery, carry a zoom for the smaller stuff.
Filters: A circular polarizer will take the edge off a
harshly lit sky and bring out the clouds (if you ever happen to see one).
 |
Techniques |
 |
The harsh glare of the sun provides the biggest obstacle to getting good desert
photos. The contrast between full sunlight and shadows either results in overexposure or
overly black shadows. Learning to recognize those conditions that will result in a poor
picture is half the battle in getting a good image.
-
Avoid shots with direct sun and lots of shadows (easier said than
done), the results are always disappointing.
-
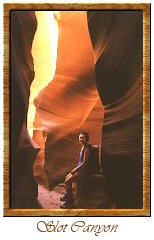
In canyons, look for areas lit with reflected sunlight - not only will this reduce the
contrast, it will also allow you to take advantage of the orange/pink glow thrown off by
the sandstone walls.
-
As any photographer will tell you, cloudy days are best for providing even lighting to a
scene.
-
Use the circular polarizer to help bring out the blue of the sky, avoid heavy
polarization though as it tends to make a blue sky almost black.
-
Use of a low speed film will give the best color saturation and detail. Low light
conditions, however, will force you to use very slow shutter speeds which can result in
blurring for hand held photos. A light weight tripod might be worth carrying to get clear
pictures in these situations. The photos taken here were all hand held - in canyons the
author would brace himself against a wall hold his breath and slowly squeeze the shutter
release.
-
When composing the scene you are photographing, mentally divide the picture into a grid
consisting of nine segments (three rows, three columns). Place the main subject of your
photo into the segment which lends itself best to the composition. Photos with the subject
in the center of the picture every time become tiresome rather quickly. Experiment with
different compositions to add life to the scene.
|
 Other helpful tips:
- Keep your camera in a zip lock bag when not in use, it
will reduce exposure to fine dust particles which are unavoidable when
hiking.
- For caving or climbing, provide padding around your camera for protection from banging,
dragging, dropping, etc. - an old sweatshirt works fine.
Take lots of photos, learn from your
mistakes/successes and before long you'll only be throwing out 3/4
of the pictures from each roll. |
|
 |
Philosophy
|
 |
Arizona native Barry Goldwater worked as a photographer and film maker for
several years before entering the world of national politics. Many of the pictures he took
of Native Americans during this period are now considered to be valuable documentation of
a way of life which has since ceased to exist. You may consider the photos you are now
taking of wild areas to be a form of documentation for future generations of what was lost
in the short sighted pursuit of short term profits and convenience.
 |
Author's
Equipment |
 |
Film:
Camera - Minolta 7000i
Lens - 28mm, 70-210mm zoom
Filters - circular polarizer
Flash - Minolta 3200i |
Digital:
Camera - Canon PowerShot A70
Waterproof camera housing
Wide angle lens |
|
|

